Exporting data
OCRIS Mobile provides a number of ways to export your data:
These functions are available from the Importing / Exporting tab.
Validated exports
The most important export function in OCRIS Mobile is the "validated export". This type of export only outputs data that has passed OCRIS Mobile's strict validation process. As a result, you can be sure that the data coming out of a validated export meets a certain level of quality, and is ready to be used. In addition, a row of data exported via a validated export is only ever exported once - ensuring that no unintended duplicates will ever be recorded.
Note that a validated export can only be performed if all of the data to be exported is valid according to the validation rules set in the logger. Please review the data and fix any errors before attempting to run a validated export. Alternatively, rows can set to be "on hold" (Export Status = H) to exclude them from the export.
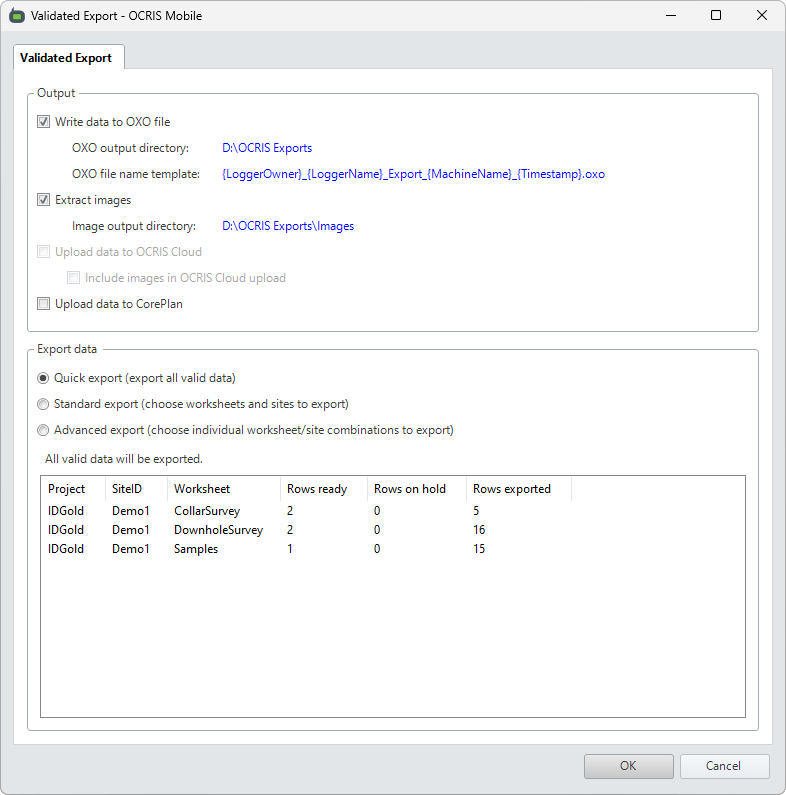
The export can be configured as follows:
- Write data to OXO file? - If this option is selected, the exported data will be save to an OXO file. In normal usage of OCRIS Mobile, this should always be selected. The OXO file is your primary export mechanism, and all validated exports should include the data in an OXO file unless you have very specific custom requirements.
- OXO output directory - This determines where the OXO file(s) will be saved to. To set or change the directory, click on the blue link text to open up a file browser UI.
- OXO file name template - This is a pattern defining how the OXO file(s) should be named. To set or change the pattern, click on the blue link text to open up the file name pattern UI. Refer to the file name patterns section below for more information.
- Extract images - If this option is selected, any images or photographs in your data will be saved to the specified directory.
- Image output directory - This determines where any images or photographs will be saved to. To set or change the directory, click on the blue link text to open up a file browser UI.
- Upload data to OCRIS Cloud - This option is currently restricted to OCRIS Cloud subscribers only. Please discuss with your OCRIS vendor if you need access to OCRIS Cloud.
- Upload data to CorePlan - This option allows you to upload your OCRIS Mobile data to CorePlan. Please discuss with your OCRIS vendor if you want to integrate your OCRIS system with CorePlan.
Once the general data format and location settings have been set, you must then choose which data to include in the export. The following options are available:
- Quick export: Exports all valid worksheets on the logger.
- Standard export: Allows you to choose which sites and worksheets to include in the export.
- Advanced export: Gives you full control of exactly which worksheet and site combinations are included in the export.
Please refer to the selecting the data to include in a validated export section for more information.
Once all of the settings above have been configured, you can press OK to run the export.
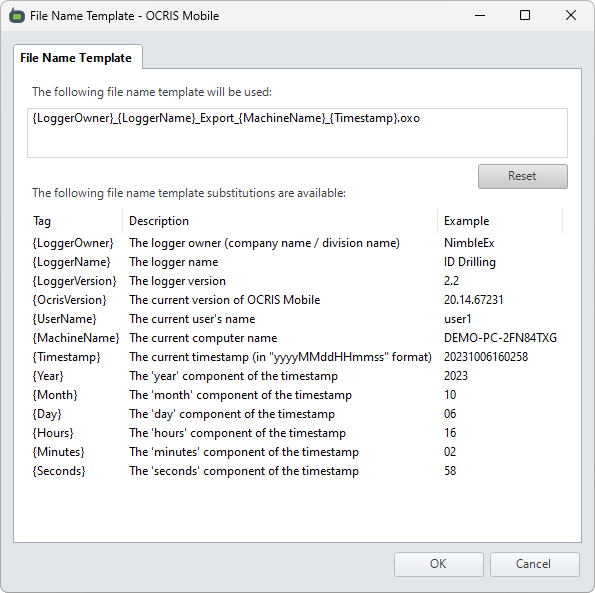
File name pattens for validated exports
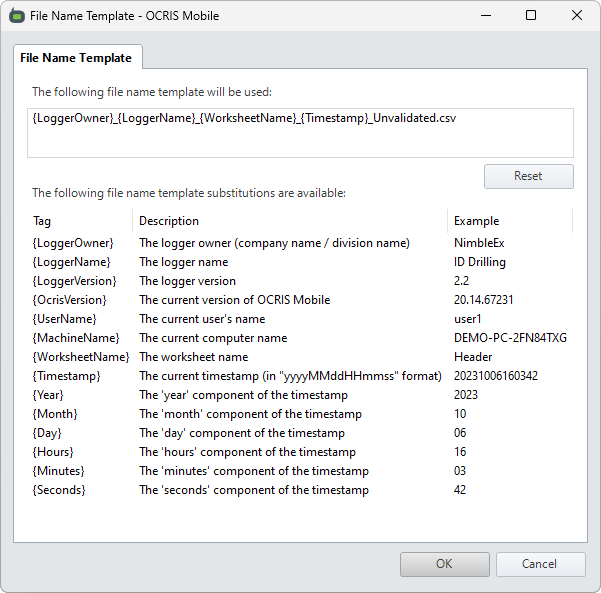
Rather than prompt the user to define their file name every time they run an export, a pattern is used automatically generate the required file names. The pattern is just plain text, but may contain the following tags that will be substituted for their actual values when the export is run:
| Tag | Substituted value |
|---|---|
| {LoggerOwner} | The logger owner (company name / division name) |
| {LoggerName} | The logger name |
| {LoggerVersion} | The logger version |
| {OcrisVersion} | The current version of OCRIS Mobile |
| {UserName} | The current user's name |
| {MachineName} | The current computer name |
| {Timestamp} | The current timestamp (in "yyyyMMddHHmmss" format) |
| {Year} | The 'year' component of the timestamp |
| {Month} | The 'month' component of the timestamp |
| {Day} | The 'day' component of the timestamp |
| {Hours} | The 'hours' component of the timestamp |
| {Minutes} | The 'minutes' component of the timestamp |
| {Seconds} | The 'seconds' component of the timestamp |
Selecting the data to include in a validated export
When selecting the data to include in an validated export, you have three options:
- Quick data selection
- Standard data selection
- Advanced data selection
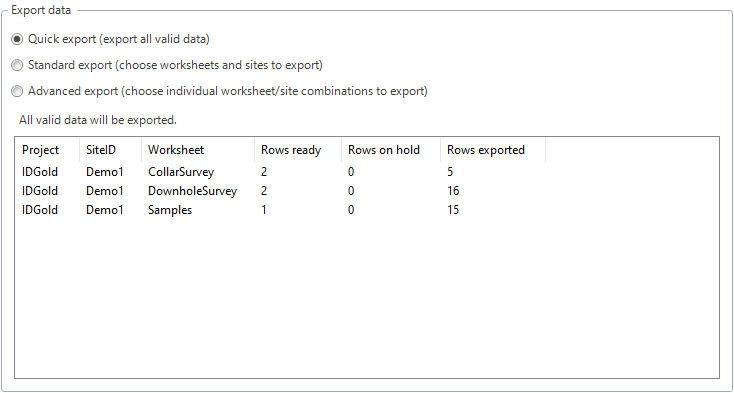
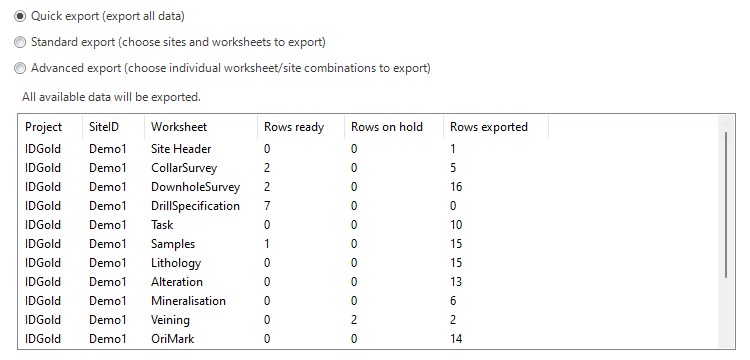
Quick data selection
The quick data selection option will export valid from the logger. However, if a worksheet has ANY errors for a particular site, that entire worksheet/site combination will be excluded from the export (including valid rows) until the errors are fixed, or until the rows with the errors on them are placed on hold.
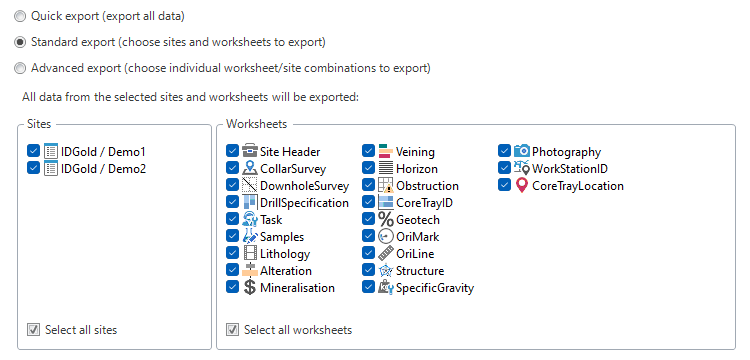
Standard data selection
The standard data selection option will show you a list of all sites and all worksheets in the logger. You can select which sites you want to export, and then select which worksheets to include for those sites.
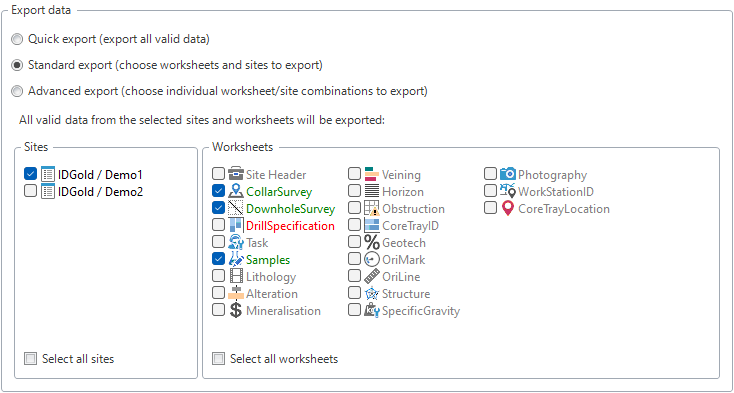
Once one or more sites are selected, the worksheet view will update as follows:
| Worksheet color | Available for export? | Summary |
|---|---|---|
| Red | No | The worksheet contains errors in at least one of the selected sites, and thus cannot be exported until the errors are fixed. |
| Grey | No | The worksheet contains no unexported data for any of the selected sites, and thus cannot be exported. |
| Green | Yes | The worksheet contains valid data for at least one site, and is thus ready for export. |
Only worksheets that are colored green may be exported.
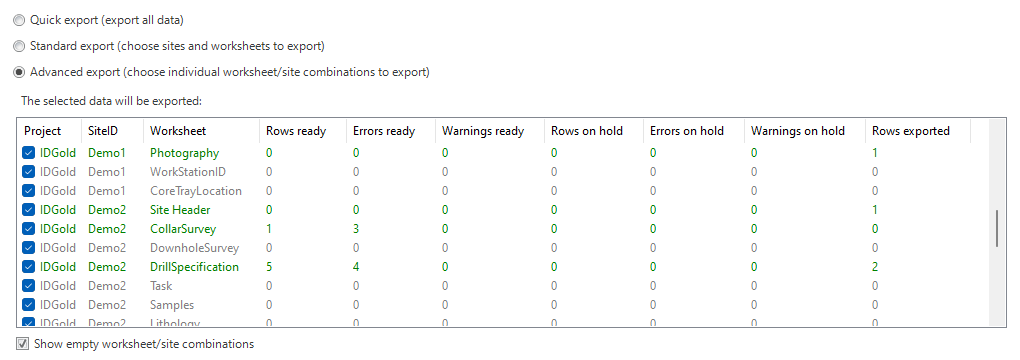
Advanced data selection
The advanced data selection option will show you a list of every possible combination of worksheets and sites. You can individually select which ones to include in the export.
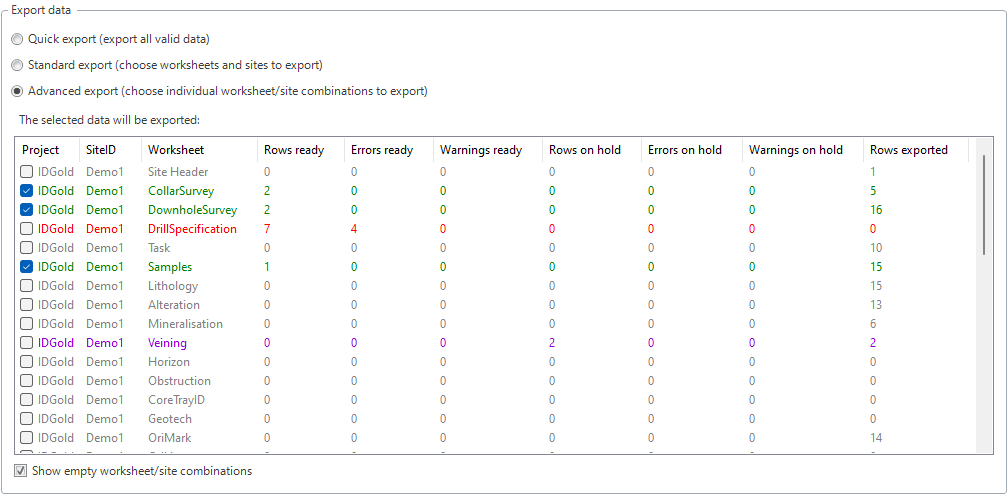
The worksheet/site combinations will be color-coded to help you make quick decisions about their status:
| Color | Available for export? | Summary |
|---|---|---|
| Grey | No | No unexported data present. |
| Purple | No | No unexported data present, except for rows on hold. |
| Red | No | Validation errors need to be fixed. |
| Yellow | Yes | Can be exported, but some validation warnings are present. |
| Teal | Yes | Ready for export, but some rows are on hold. |
| Green | Yes | Ready for export. |
Only worksheet/site combinations that are colored yellow, teal, or green may be exported. However, it is recommended that any validation warnings are fixed before exporting.
Alternatively, if you do not wish to use the color-coding system, the following stats about each worksheet/site combination will be included to allow you to choose what to export:
| Category (shorthand) | Description |
|---|---|
| Rows ready | Number of rows containing data thas is ready for export. |
| Errors ready | Number of errors in the 'rows ready' data. |
| Warnings ready | Number of warnings in the 'rows ready' data. |
| Rows on hold | Number of rows that have been set to 'on hold'. |
| Errors on hold | Number of errors in the 'on hold' data. |
| Warnings on hold | Number of warnings in the 'on hold' data. |
| Rows exported | Number of already-exported rows. |
Unvalidated exports
A unvalidated export is an alternative way of exporting from OCRIS Mobile. As the name suggests, it skips the usual validation steps that are in place to protect the data integrity. An unvalidate export will export ALL selected data - including data that has already been exported, and data that has failed the validation process. Running an unvalidated export will not change the export status of a row, so you can run as many unvalidated exports as you like without affecting the integrity of the data coming out of the validated export process.
There are two types of unvalidated exports available in OCRIS Mobile:
- A 'one-off' unvalidated export, where the data is selected and a single export is performed.
- A 'recurring' or 'scheduled' unvalidated export, where the export is performed on a recurring schedule, so that it can be periodically consumed on-the-fly by external tools.
Unvalidated exports (one-off)
A one-off unvalidated export can be triggered by clicking on the Unvalidated export button on the Importing / Exporting tab.
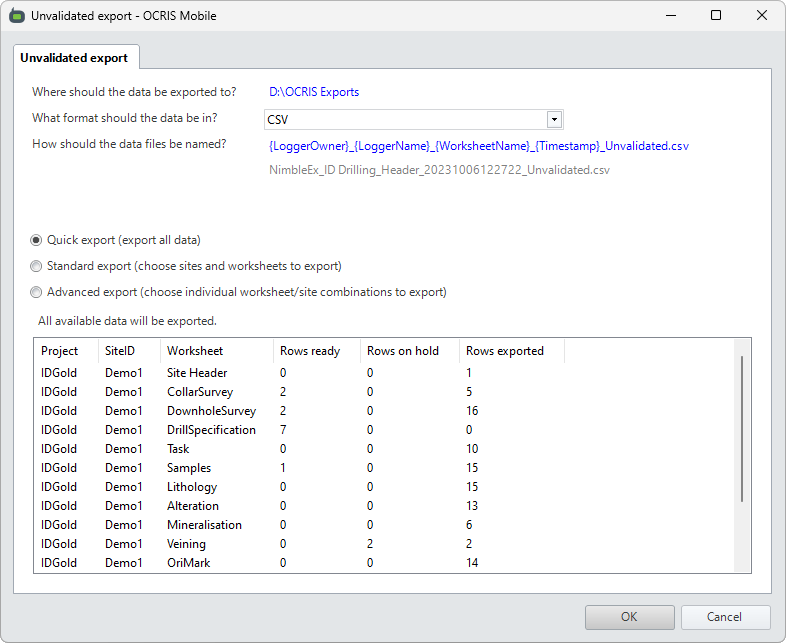
The export can be configured as follows:
- Where should the data be exported to? - The output directory will be shown here, as a blue link. Click on the link text to select a different directory.
- What format should the data be in? - This is a drop-down menu, allowing you to choose the format of the exported data. The options are CSV or Excel.
- How should the data files be named? - This is a pattern defining how the resulting data files should be named. Click on the blue link text to open up the file name pattern UI to customize this. Refer to the file name patterns section below for more information.
Once the general data format and location settings have been set, you must then choose which data to include in the export. The following options are available:
- Quick export: Exports all data on the logger.
- Standard export: Allows you to choose which sites and worksheets to include in the export.
- Advanced export: Gives you full control of exactly which worksheet and site combinations are included in the export.
Please refer to the selecting the data to include in an unvalidated export section for more information.
Once all of the settings above have been configured, you can press OK to run the export.
Unvalidated exports (recurring)
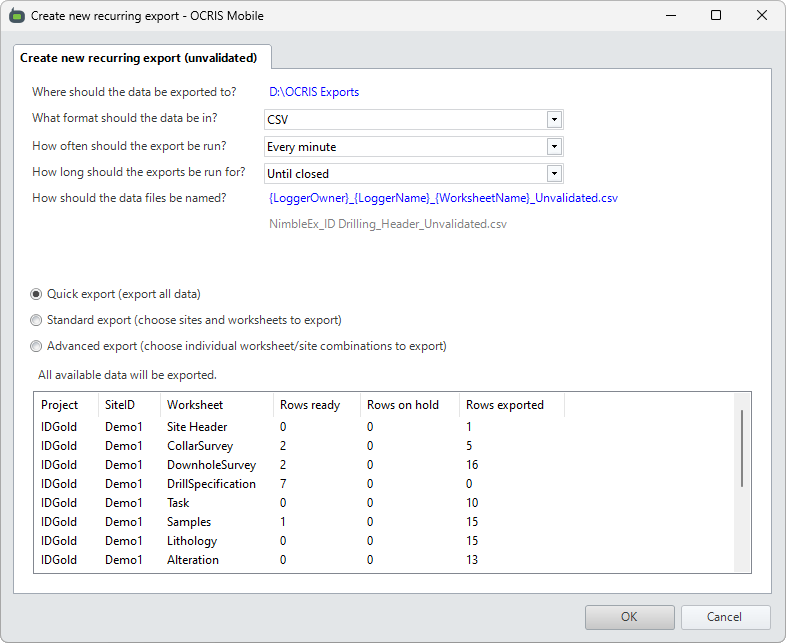
A recurring unvalidated export can be triggered by clicking on the Recurring export button on the Importing / Exporting tab.
The export can be configured as follows:
- Where should the data be exported to? - The output directory will be shown here, as a blue link. Click on the link text to select a different directory.
- What format should the data be in? - This is a drop-down menu, allowing you to choose the format of the exported data. The options are CSV or Excel.
- How often should the export be run? - This is a drop-down menu, allowing you to choose how often the export should be run.
- How long should the exports be run for? - This is a drop-down menu, allowing you to choose long the exports will be run for before stopping.
- How should the data files be named? - This is a pattern defining how the resulting data files should be named. Click on the blue link text to open up the file name pattern UI to customize this. Refer to the file name patterns section below for more information.
Once the general data format and location settings have been set, you must then choose which data to include in the export. The following options are available:
- Quick export: Exports all data on the logger.
- Standard export: Allows you to choose which sites and worksheets to include in the export.
- Advanced export: Gives you full control of exactly which worksheet and site combinations are included in the export.
Please refer to the selecting the data to include in an unvalidated export section for more information.
Once all of the settings above have been configured, you can press OK to start the export running.
If you need to view the status of existing recurring exports, you can click on the Manage exports button on the Importing / Exporting tab.
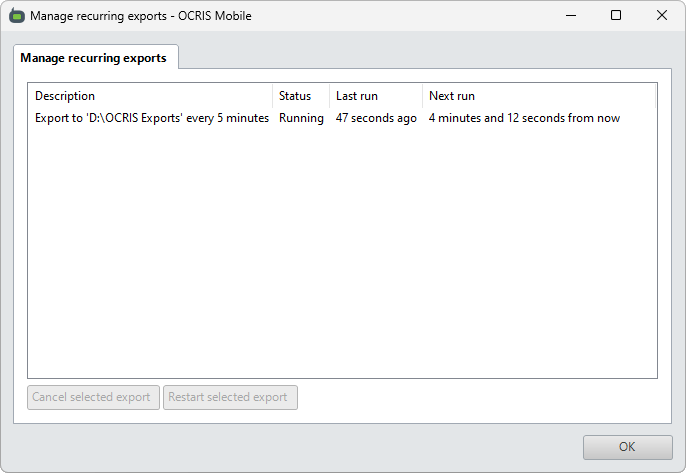
This will show you a list of all current recurring exports, as well as information on when they were last run and when they will next run. They can be cancelled or restarted from this interface.
File name pattens for unvalidated exports
Unvalidated exports may create many files, depending on the type of the export, and how many worksheets are included. Rather than prompt the user to name each of the files individually, a pattern is used automatically generate the required file names. The pattern is just plain text, but may contain the following tags that will be substituted for their actual values when the export is run:
| Tag | Substituted value |
|---|---|
| {LoggerOwner} | The logger owner (company name / division name) |
| {LoggerName} | The logger name |
| {LoggerVersion} | The logger version |
| {OcrisVersion} | The current version of OCRIS Mobile |
| {UserName} | The current user's name |
| {MachineName} | The current computer name |
| {WorksheetName} | The worksheet name |
| {Timestamp} | The current timestamp (in "yyyyMMddHHmmss" format) |
| {Year} | The 'year' component of the timestamp |
| {Month} | The 'month' component of the timestamp |
| {Day} | The 'day' component of the timestamp |
| {Hours} | The 'hours' component of the timestamp |
| {Minutes} | The 'minutes' component of the timestamp |
| {Seconds} | The 'seconds' component of the timestamp |
Note: Exports that generate multiple files (one for each worksheet) must include the {WorksheetName} tag so that a unique file can be generated for each worksheet.
Selecting the data to include in an unvalidated export
When selecting the data to include in an unvalidated export, you have three options:
- Quick data selection
- Standard data selection
- Advanced data selection
Quick data selection
The quick data selection option will export all data from the logger. A summary of the data to be exported will be shown.
Standard data selection
The standard data selection option will show you a list of all sites and all worksheets in the logger. You can select which sites you want to export, and then select which worksheets to include for those sites.
Advanced data selection
The advanced data selection option will show you a list of every possible combination of worksheets and sites. You can individually select which ones to include in the export.
Printing
OCRIS Mobile allows you to print the contents of a selected worksheet by clicking on the Print data button while the desired worksheet is selected.
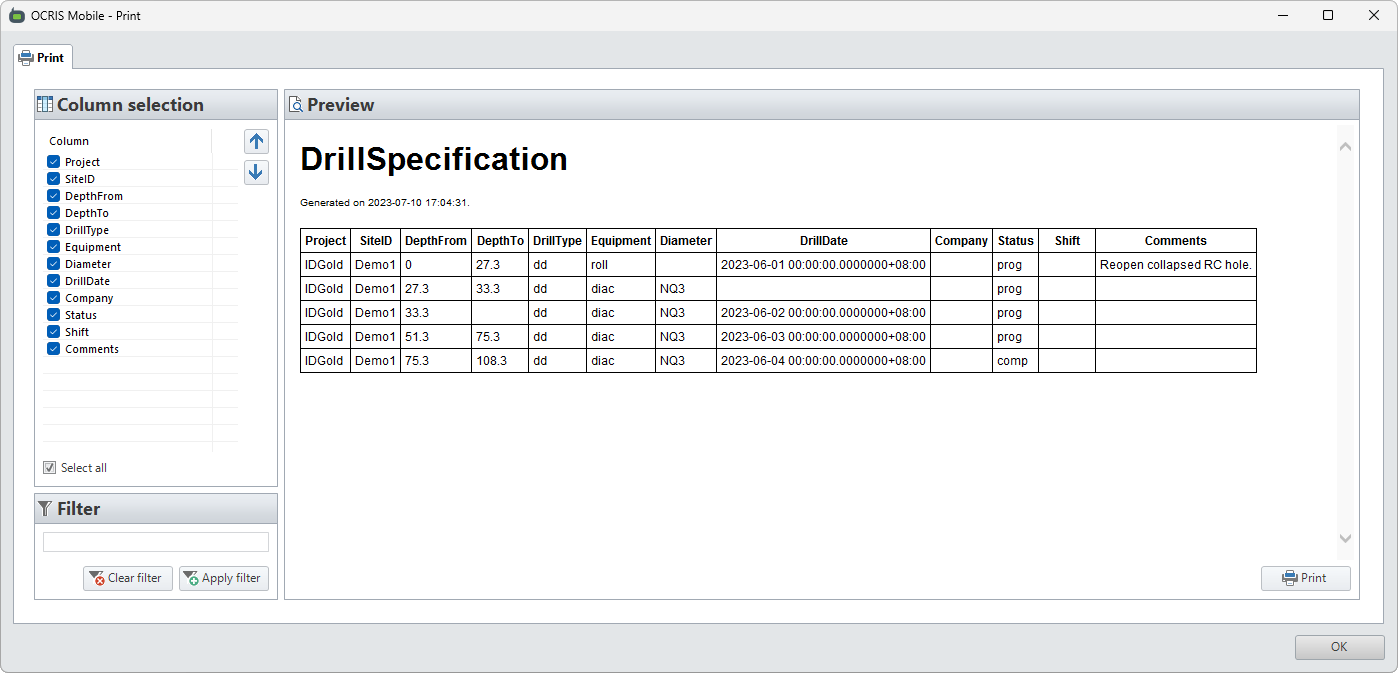
This UI will allow you to select the columns to display, apply a filter if necessary (in SQL format), and then print the resulting data.
Choosing which columns to include
The checboxes on the left side of the screen allow you to choose which columns to include.
Filterting rows
The rows can be filtered using a SQL query.
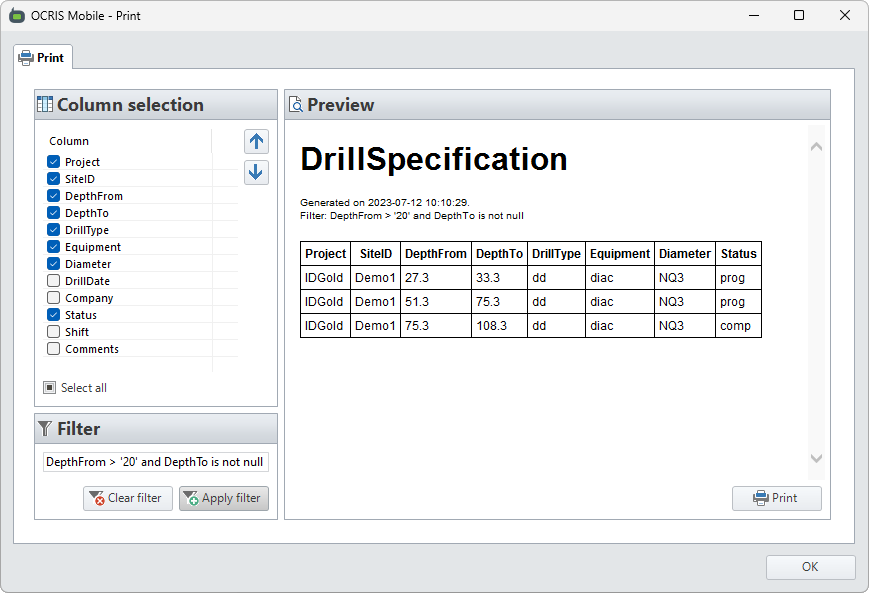
Example: Choosing columns and filtering rows
The following example shows a print preview of the DrillSpecification worksheet, with the DrillDate, Company, Shift, and Comments columns hidden, and the DepthFrom > '20' and DepthTo is not null filter applied.
Other export-related utilities
There are a few other export-related utilities available on the Import/Export menu:
Toggle export status
You can click on the Toggle status button to open an interface that allows them to bulk toggle the export status of rows in the logger.
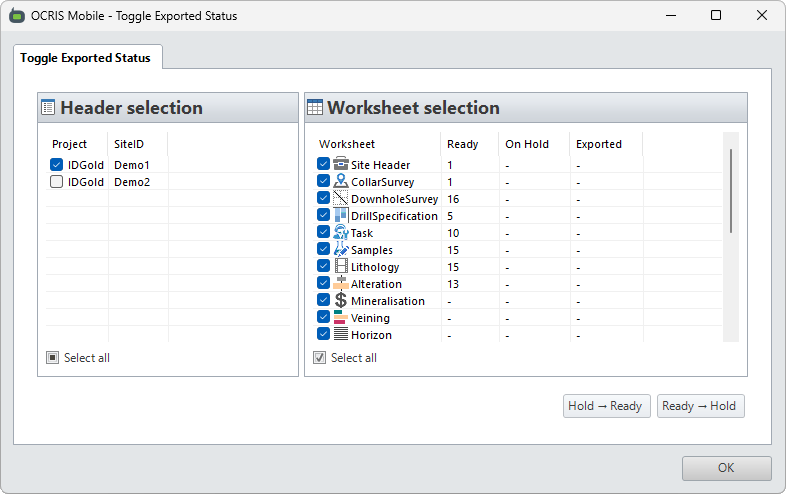
The left panel allows you to select which sites will be selected. The right panel allows you to select which worksheets will be selected.
- The
Hold -> Readybutton will toggle the status for allon-holdrows in the selected sites/worksheets, turning them intoreadyrows. - The
Ready -> Holdbutton will toggle the status for allreadyrows in the selected sites/worksheets, turning them intoon-holdrows.
Find unexported rows
You can click on the Find unexported button to open an interface that allows them to quickly and easily find which sites and worksheets contain unexported rows.
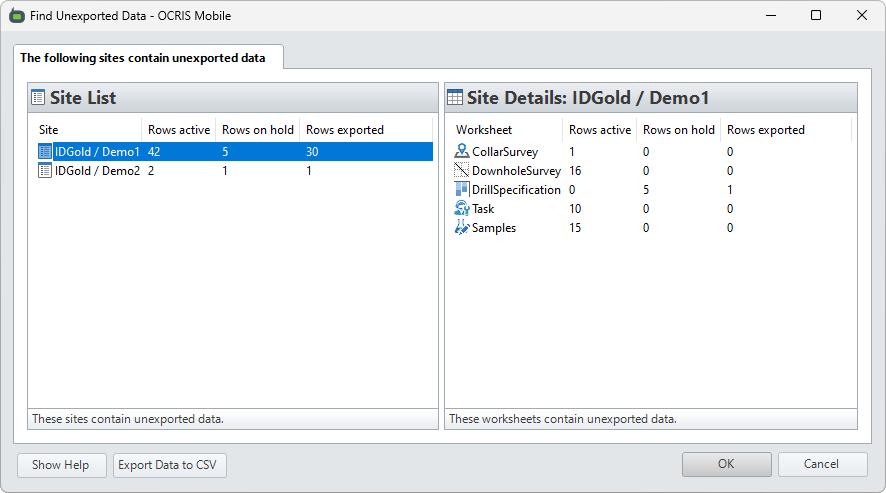
The left panel shows a list of all sites, and a count of the active rows, on-hold rows, and exported rows.
Clicking on a site in the left panel will show a site summary in the right panel. This displays a worksheet-by-worksheet breakdown of the active rows, on-hold rows, and exported rows for the selected site.